
AquaFix Circo Shower Cubicle Kit 1250mm dia. x 2460mm Inc. Glass Door
Product Code: 30545
AquaFix Circo Shower Cubicle Kit 1250mm dia. x 2460mm - Including Glass Door\nIncluded in this kit are the following items:-\n\nCirco Shower Base\nCirco Shower Walls\nAquaFix High Flow Square Waste\nAquaFix Installation Kit\nCurved Frameless Glass Door, 8mm Glass & Chrome Hinges, Suits Left & Right Opening\n\nYou will require the following items to complete the installation of the AquaFix Snail Cubicle:-\n\nHard Point Saw\nBucket - BUY HERE\nSolvent Weld Adhesive - BUY HERE\nMeasuring Jug\nTape Measure - BUY HERE\nStraight Edge\nJunior Hacksaw\nLevel\nSealant Gun - BUY HERE\nBreathing Protection\nPencil\nPaint Brush (wood floors only)\n\n?\nStep 1? Lay the shower tray into the required position. Through the drain in the shower tray mark the floor to show where the drain will sit (in order to get your plumbing in the correct location) Carefully remove the shower tray and store somewhere safe.\n?\n?\n?\nStep 2 Remove flooring as necessary to carry out works to the wastepipe. Please note that if there is a joist in the way of the shower drain base you will need to consult a professional joiner or structural engineer for advice.Handy Hint: The Circo Cubicle can be installed with a Circo Substrate Element which is available to purchase separately through your retailer. The Substrate Element will raise the tray an additional 80mm and is used where your waste and wastepipe cannot be located with the floor joists.\n?\nStep 3 For water to drain away properly, the wastepipe must have a fall of at least 3cm per metre. Make any alterations to your wastepipe to meet the position marked in step 1. The wastepipe must be properly supported to hold its own weight and that of the shower drain base. Spread solvent weld adhesive around the inside of the shower drain connector. Push the shower drain base onto the shower drain connector with a twisting action. Spread solvent weld adhesive around the inside of the opposite end of the shower drain connector and then slide onto the wastepipe with a twisting action. Once the solvent weld has set; pour water down the drain to check that the waste is not blocked and that there are no leaks. Replace the flooring ensuring that an adequate hole has been cut to allow for the shower drain base to be exposed through the floor. Smear some lubricant around the black rubber seal on the shower drain base. Please note: The hole size should be no bigger than 180 x 180mm.\nStep 4 Primer...\n?\n?\n?\n?\n?\nStep 5 Put on the protective gloves and wear eye and breathing protection. Mix the 5kg bag of Fix-KST adhesive with approximately 1 Litre of water in a clean bucket which will give the adhesive a stiff consistency. Spread the Fix-KSTadhesive onto the floor of the shower position and drag the notched adhesive trowel across the surface. The notched adhesive trowel will make a ribbed pattern which will leave just the right amount of adhesive on the floor.\n?\n?\nStep 6? Place the shower tray into position and bed down onto the adhesive cement. Check that the shower tray?is level in both directions using a suitable level.\n?\n?\n?\n?\nStep 7 Put your fingers through the drain hole in the shower tray. Push down on the shower tray and pull the shower drain base upwards until it clicks into place into the drain hole in the shower tray.\n?\n?\n?\n?\nStep 8 Ease the shower drain internal bowl into the shower drain base. Ease the shower drain internal dome into the shower drain base. When you have finished you can remove the protective gloves and eye and breathing protection.\n?\n?\n?\n?\n??? \n??? \nStep 9Using a tape measure, measure the distance between the surface of the shower tray and the ceiling. We recommend that you take an additional 5mm from your measurements so that the assembly can be lifted into position more easily. Carefully mark the cut position on each wall section & using a pencil and straight edge. Cut the sections carefully using a hard point saw.IMPORTANT NOTE: The vertical assembly opening has a strengthening (clear plastic) strip at one side to help support the shower door profile/hinges. Please ensure that you flip the assembly to the correct orientation for your application, i.e., door swing. We strongly recommend that you make note of which side the strengthening strip has been installed as this will not be evident once the cubicle has been tiled.If you plan to install your Circo Cubicle with the optional Flat Roof (available to purchase separately through your retailer), you may wish to skip this step and immediately follow Step 10 before then gluing the Flat Roof into position using a thin wavy line of Fix-PU.\n??? \n??? \nStep 10Offer the vertical assembly into place on top of the shower tray with the header and sacrificial footer helping to keep the assembly shape. Hold the assembly in place using ratchet straps. Note: Do NOT glue the vertical sections together at this stage. Using a pencil, mark around the inside of the vertical assembly on the shower base and at the poi...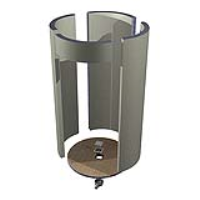
Visit the Pure Adhesion Ltd website for more information on AquaFix Circo Shower Cubicle Kit 1250mm dia. x 2460mm Inc. Glass Door
ENQUIRY FORM
More Products