More and more people are learning how to install a CCTV system on their property to give them that added layer of protection against intruders. Now, when it comes to installing a CCTV system, the obvious thing to do is call in the professionals, however some people prefer to attempt the installation themselves.
The purpose of this blog post is to take anyone who is looking to install their own CCTV system through the process from start to finish. We’ll also take a look at the benefits of using a professional for all those of you who are not confident enough to take on the job. So, if you are thinking about installing your new CCTV system yourself, read on.
Planning is Key
Planning is a key component of any CCTV Installation whether you are a professional or DIY enthusiast. The first thing you should do is create a security checklist in which you take a close look at your current security set up. The purpose of this is to highlight any areas of weakness in and around your property with a focus on entry points. The information you get from this can be used when you are making a decision on what size of security system you need, and what features you want to include.
All the wiring you need to install your CCTV system will normally be included in the package. Nevertheless, the amount of cable you need to set up your security system could have an effect on it. For example, a standard DVR setup requires coaxial cables which can lead to image quality degradation over distances exceeding 90 metres.
What Resolution and Image Quality do I need to Clearly Capture Details like Faces and licence plates?
If you want clear images of important details such as faces and licence plates, you need a resolution of at least 1080p and our advice would be to choose full HD. However, 4K (Ultra HD) offers exceptional detail, particularly for covering larger areas. Higher resolutions provide sharper image quality, even when zooming in on footage. The best resolution also depends on the camera’s distance from the target area—1080p may be sufficient for closer views, while 4K is ideal for larger spaces or key entry points to capture finer details.
Decide Where to Place the Cameras and Prepare Installation
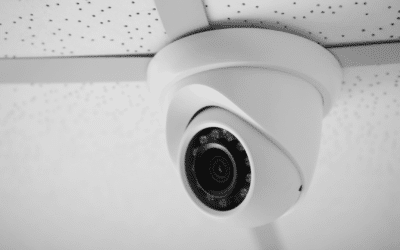
You should always point cameras so that they capture the area you want covered without too much focus on brighter spaces such as lights, doors and windows. While having sufficient lighting is important, if you have too much there is a chance that the quality of the images could be diminished. This is why where you place your cameras and DVR is especially important when you set up your CCTV system. The reason for this is to help you get maximum coverage from your CCTV system while keeping the lengths of the cables as short as possible.
When you are making a decision on where to locate your CCTV cameras, try and find a spot that has a clear view of all possible access points. You will also need to have access to power close by and you should be able to cite the cameras at a height where they can’t be easily damaged.
Once the decision has been made, on the camera drill, pilot holes and insert the screw anchors. Ensure the camera is firmly secured in place, then connect its power cord to an outlet.
Run Cables to the Cameras
Once the cameras are in place you can start to run the cabling. For the cables to get to the cameras it will probably be necessary to drill holes in the walls or ceilings of your property. The connectors you need for your ethernet cables may not be pre-installed so it may be necessary to fit your own.
Connect the Cables to the DVR
The first thing to do is plan how you intend to route your cables that connect your cameras to the DVR. You will need to connect a pre-terminated cable from the location of the camera to the DVR control point. We recommend that you situate the male power plug next to the camera.
The power outlets are generally located on the side of control panels and the black BNC cable belonging to the camera should be connected to the video input socket on the DVR that corresponds with it. It is your choice whether you wall mount the DVR box, most will have mounting holes in the back just like wall outlets or surge protectors. If you prefer, you can also place the DVR box on any type of flat surface such as a table.
Mount and Install the Cameras
The first thing to do is to attach the cable to the camera, making sure any surplus cabling is pushed back into the opening in the wall or ceiling. The camera should then be attached to the building with the screws that are included with your system. Once the camera has been installed, its position can be easily adjusted by loosening and tightening the screws, should you want to do any fine tuning.
Turn on the Power
You can start to connect the cables to the DVR as soon as they have been routed through your property. The external monitor, keyboard and mouse can then be connected to the DVR box making sure each cable goes into the port that corresponds with it. If you want to you can keep an external USB drive permanently connected so you can transfer footage quickly. It’s important to note that the DVR and cameras use a shared power source. Connect the DVR, monitor, and cameras to the main power supply.
Set-up the DVR
You are then ready to finish the installation and when you finalise the setting up of your DVR box make sure you follow any instructions in the manual. Sometimes you will need to install a hard disc before using the system and other times it will already be installed, allowing you to start using the system immediately.
Should I choose a wired or wireless system?
Choosing between a wired or wireless CCTV system depends on your property layout and power accessibility. Wired systems offer stable connections and are ideal for larger properties but require extensive cabling. Wireless systems are easier to install and more flexible but depend on a strong Wi-Fi signal and nearby power sources.
Do I need any special permissions or adhere to privacy regulations when installing cameras?
Yes, if your cameras capture areas beyond your property, such as sidewalks or neighbours’ spaces, privacy regulations may apply. In some regions, specific permissions are required to install CCTV, particularly for commercial properties. Familiarise yourself with local laws to ensure compliance, especially regarding video storage and signage requirements.
What are the benefits of Using a Professional CCTV Engineer to Install your System?
While this blog post is about how to install your CCTV system yourself, we thought we would also look at some of the benefits of getting in the professionals. While we appreciate that there is a cost associated with using a trained CCTV engineer it can sometimes save money in the long run.
Hiring a professional will guarantee that your system is expertly installed and that you get optimal camera placement that covers all important areas without blind spots. The technical knowledge engineers have means that they can seamlessly integrate all parts of your system ensuring reliable performance. They will also help ensure you are fully compliant with local privacy regulations as well as offering ongoing support.
The team here at Argus fire and security have a comprehensive range of CCTV systems available that can be adapted to any home or business. We also offer a full and professional installation services for clients from both the residential and commercial sector. If you are interested in finding out more about our range of services, contact the team here at Argus today.